
The calvary at the crossroads at Le Gheer, sited exactly where it was a hundred years ago. There’s a photograph of it taken in 1915 in the late Tony Spagnoly’s excellent book ‘A Walk Round Plugstreet’, and you will find another one if you enlarge the photo of the nearby information board (scroll down a bit). I can’t tell for certain whether the present figure of Christ is the same as the original, though it may well be, and it may also be that the wooden cross is original; it certainly suffered damage during the war, and its unusual proportions suggest that the arms of the cross may have been shortened as a consequence. I wonder?

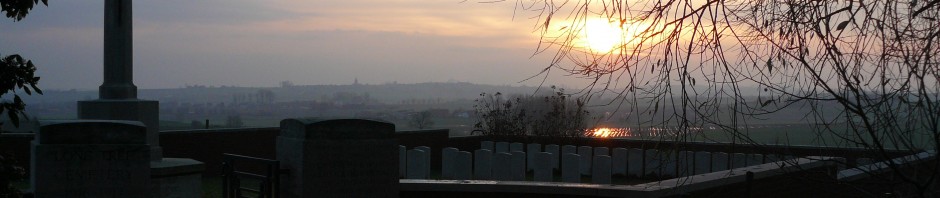
Dusk view of the calvary at Le Gheer…

…and, also taken in the evening, two views looking west (above), back the way we came from Lancashire Cottage Cemetery, and east (below) towards the British front line,…

…which ran across the road from left to right approximately where the two cars can be seen in the centre of the picture.

Information board detailing the actions that took place around here in late 1914.

Before we continue our journey up the eastern edge of the wood, let’s briefly carry on past the calvary and through Le Gheer a little way to the east. This picture shows the view from the approximate site of the German second line trenches looking west towards Ploegsteert Wood; if you zoom in you can just see the houses at Le Gheer to the left of the wood.

As I said, just a brief diversion. Here, we are back at the Le Gheer crossroads, and that’s the road we must now take as we head north up the eastern edge of the wood.

A couple of hundred yards up the road, this view looks back at the houses visible in the previous photograph, with the crossroads at Le Gheer in the distance. The British front line ran parallel to the road, a matter of yards into the field on the left of the picture.

Just as it did ninety five years ago (see trench map), this cornfield (above and below) still cuts in to the edge of the wood.

Looking at the trench map, you will notice that the British front line crossed the road at this point, running through the cornfield and disappearing into the wood before continuing north…

…towards the site of the German front line strongpoint known as the Birdcage.

These houses (the hamlet of Le Pelerin) stand on the site of the Birdcage, named as such on account of the amount of barbed wire that surrounded it. The German front line ran directly under the house in the centre of the picture.

The Birdcage. Standing right on the German front line at this point, it’s impossible to imagine what this place must have been like between the first actions in October 1914 and the spring of 1918, when the Germans briefly captured Ploegsteert Wood. Designed to ensure the British were unable to break out of their trenches within the eastern boundary of the wood itself and sweep through the German defenses towards Comines, the Birdcage did its job well enough. The graves of the men from the Somerset Light Infantry that we visited way back in Part Four of our tour prove as much.

Worth looking at the map on this information board, the English text enlarged at the bottom,…

…as the next few pictures show the fields to the east of Ploegsteert Wood, beneath which thousands of pounds of explosives still lie. Explanation time. At 3.10 a.m. on 7th June 1917, nineteen huge mines, totalling some 900,000 lbs of explosives, erupted along the German front line from Hill 60 in the north, some mile and a half due east of Ypres (Ieper), to the mine (officially called Trench 122 Right) at Factory Farm, not far north of where we now stand. The battle of Messines had begun. The British, in actual fact, had laid twenty five mines the previous year in preparation for the offensive, but for varying reasons two further north were not detonated, along with four in the fields around us here. Just prior to the British attack the Germans in this area had pulled back a few hundred yards; if the mines were exploded now, it would be Germans, not British, who would be the first to occupy the subsequent craters, and craters make excellent defensive positions. The decision was made to abandon all four mines, and 112,000 lbs of explosives lay undisturbed until 1955, when lightning caused one of them to explode, I believe at the unfortunate expense of a local cow. The remaining three lie here still.

So before we continue north we shall take the road east, just a little way, and have a look around. The view above looks west, back towards the houses on the German front line at the Birdcage. Umbro Trench crossed the road at about this point (see trench map), and one of the unexploded mines lies beneath the field to the left (see below). Ploegsteert Wood, ever present, is in the background.

Once thought to be the site of the 1955 explosion (see ‘A Walk Round Plugstreet’, mentioned earlier),…

…surviving tunnellers’ and engineers’ maps such as these now show us that this field actually contains one of the unused mines…

…whereas, turning round, we now know that the site of the 1955 detonation was actually north of the road, somewhere to the left of the field pictured.

This panorama looks north east. The trees on the horizon to the far left surround the crater made by one of the nineteen mines that were detonated, Ultimo Crater, while another, the previously mentioned Factory Farm Crater, is just a short distance nearer the camera; we shall visit both in the final part of our Tour. The second of the unexploded mines, aimed to detonate beneath Umbro Support Trench (see trench map), is just ahead of us close to the road, and the final one is somewhere beyond the vehicle tracks to the left of the picture.

View looking east towards the German rear area from the same spot. Note the house in the centre of the picture, as it will come in useful to get our bearings during the final part of the Tour. And with that, I think it’s time we returned to the road to continue our journey up the eastern edge of the wood.

After just a few minutes we find ourselves at the north eastern corner of the wood, and we shall soon turn west to roughly follow its northern boundary back to Prowse Point. This final view looks back towards the area of the Birdcage; the British front line emerged from within the wood here, crossing this cornfield from right to left before following the the line of the road northwards. As we shall also do, in the final part of our tour: A Tour of Ploegsteert Wood Part Twelve.
Bonjour,
J’habite à Prémesques (où le Prince of Wales ‘s Leinster Regiment du colonel MATHER reçu son baptême du feu avec de lourdes pertes) à 7 km de Ploegsteert et l’histoire de la WW1 me passionne.
Merci pour ce site absolument remarquable ! Si je peux vous aider d’une quelconque manière, n’hésitez pas, ce sera un plaisir.
Les quelques milliers de km accomplis à vélo dans la région d’Ypres me permettent de bien connaître le secteur. Cordialement,
JPL
Bonjour Jean-Paul. You will have to forgive me for replying in English, but I can read enough French to understand your message. First of all, thank you very much for your kind comments. Glad you are enjoying the site. I intend to visit the CWGC and communal cemeteries south of the Belgian border (and only a few km north of Prémesques) either this year or next, so I might need some advice beforehand. Follow the blog or lmk your email so I can contact you if I need to, and thanks for the offer. Much appreciated, good Sir.
Cher MF, vous trouverez l’adresse email de Mr Lomel dans la section admin, sous “Comments”. 😉
Merci Monsieur Balders!
Hi,
very beautiful pics and correct information. I live in Ieper and have cycled around that area today. May I remark that the explosions on June the 7th happened at 3.10a.m., and not at 7.30 as is stated under one of the pictures.
Much appreciate your efforts to realise these tours and put them on the internet. I guess not all british people can manage to visit Flanders’ fields and thus, your work is of great use.
Your comments are much appreciated, Marnick. I do try to make the site both useful and interesting. And I have made the correction you so rightly pointed out. Things occasionally slip through, but not, one hopes, too many.
I have been reading a diary written by Capt Prideaux who served with the Somerset Light Infantry. The last few entries have been (I am reading them exactly 100 years later) about Gheer. He mentions a few times a chateau nearby and a place called Petit Pont, he managed to raid the cellar a few times. Did you by any chance see a chateau in the area or know anything about it?
Many thanks
Jackie
Hello Jackie. Petit Pont was the name of a farm (a bit more than 3 miles west of Gheer) to the west of Ploegsteert Wood that troops used as a billet. I believe that it was as far as transport could come; from there equipment had to be manhandled to the front lines. The chateau. unless you have any clues, is more difficult. There were many, but the nearest I can think of to Petit Pont is Rosenberg Chateau, about which there is an interesting post-war but war-related story to tell, that Google will doubtless unveil (there was a British cemetery there once, but it isn’t there any more).
Hello
There is also the “Chateau de la Hutte” close by. Just google that name and you’ll find everything about that castle (now in ruins still).
Very good point.
Thanks for this excellent blog.
I’ve never been to Ploegsteert, but following recent research on my Great Uncle’s time in the area in 1917 with the 10th Bn Cheshire Regiment, I believe that your photo of Ultimo Crater in the distance is the actual field he may have crossed during a trench raid against the 4th Bavarian Infantry Division on 17th Feb 1917.
He was posted as missing following this action and is remembered on the Ploegsteert Memorial to the Missing.
I’m planning my visit…….
Guy.
Fantastic stuff Guy. I would guess that the same field is also visible in some of the photos taken from Ultimo Crater in Part Twelve of this tour? The Ploegsteert area was the first part of Flanders that I got to know well, and I always like to return there. Walking down the track from Prowse Point Cemetery towards Mud Corner, and then on into the wood itself, your imagination just takes over. You will doubtless have a fabulous trip.
I hope you’ve checked out the Ploegsteert Memorial post earlier on this tour.
And thanks for your kind comments. Much appreciated.
Good Morning,
Could you direct me to a detailed description of the December 19, 1914 assault on the Birdcage. I would love to read one. Have you ever heard of a British trench line by the name ‘Hampshire T(ea) Trench. Henry Williamson mentioned it in his Great War BBC series interview.
Many thanks
I’ll have a look at a few trench maps and get back to you George.
George, as far as reading a description of the attack, I reckon that the late Tony Spagnoly’s outline in his book ‘A Walk Round Plugstreet’ is as good as any.
I have yet to check the trench maps.
A bit late George, and you’ll probably never read this, but for what it’s worth I can find no mention of the trench you mention. Sorry.
Did you ever locate the Hampshire “T” trench George ? I have a map showing it.
Map ref U 21 b, d. I eventually found it too!!
I’m currently following the movements of my great great uncle, who was a Sgt in the 19th Hussars, and found this blog to be of much interest. He remarks that on the 21st October 1914 Major McClure of his regiment was shot in the head in Gheer by a german sniper. Another source I found located it to be on the edge of some woods looking out toward the German lines. Do you know of any more information regarding where Major McClure fell? He was supposedly buried where he lay, as ‘enemy fire too hot’.
Furthermore do you know of any public/easily accessible sources citing the movements/activites of the 19th Hussars in this area? Trying to piece together as much as possible to show family and perhaps visit in years to come.
Many thanks and once again, very interesting blog!
Hello Guy. I can tell you where Major Charles Russell McClure is buried, if not where he fell. He is buried at Strand Military Cemetery which features elsewhere on my site:
https://thebignote.com/2011/01/13/a-tour-of-ploegsteert-wood-part-eight/
Strand Military Cemetery is a little way west of Gheer (there’s also a tour map in the, would you believe, Tour Map Section at the top of each page) on the western edge of Ploegsteert Wood.
Worth looking here as well:
http://www.cwgc.org/find-war-dead/casualty/165341/McCLURE,%20CHARLES%20RUSSELL
and
http://www.ypres-salient.com/19th-queen-alexandras-own-royal-hussars.html. And try to find the 19th Hussars War Diary (maybe online, or try the National Archives).
Hope that helps for starters. And thanks for your kind comments about this blog.